A very common preventive pediatric dental recommended procedure is pit and fissure sealants, or as we like to call them – “power shields” for teeth! Any molar surface that forms with deeper pits and grooves would be likely to trap food and bacteria and so the likelihood that dental decay could begin in these difficult to clean areas is quite high. Most patients can benefit from sealants around age 6 when their first permanent molars typically erupt and again when they are a bit older and erupt their second permanent molars, which is usually around age 12. Although sealants can be applied to baby molars, the biting surfaces tend to be far less groovy and susceptible to decay, and therefore we do not routinely recommend them to our patients. Sealants are made up of resin (a BPA-free plastic material) that is applied to the chewing surface of the molar teeth, protecting it as it forms a barrier to block bacteria and prevent food from trapping in those deeper crevices.
The application of sealants can help prevent decay in your child’s teeth with a few simple steps and can be completed in only a few moments per tooth. It is a non-invasive procedure that requires no removal of tooth structure and is completely painless. Here is an overview of how sealants are applied:

- First, the surface to be sealed is cleaned to be sure no plaque or food are present. The tooth is then dried and isolated with cotton rolls and/or an Isodry suction device which we call the “fishy”. It is important to keep saliva away from the tooth as it is being sealed so that the sealant is not contaminated.
- The first layer to be applied is the etch, or what we commonly tell the children is our “blue paint” or “blue shampoo”. This weak acid is used to help prepare the tooth to allow the sealant material to adhere to the tooth structure by opening up the tubules of the enamel. The etch sits on the tooth for 20 seconds, and then is rinsed off and dried.
- Next, a bonding agent is applied, aka the “tooth glue” to further encourage the sealant material to stick well to the tooth. This is simply painted on and then dried with a dental curing light.
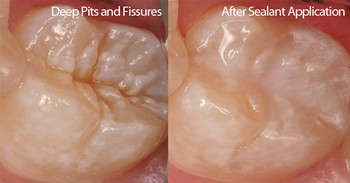
- Finally, the sealant material is painted onto the grooves of the chewing surface of the molar. The sealant is cured with the light and voila – the tooth is sealed!
Once applied, sealants can typically last approximately 5 years, or even longer if a child does not eat sticky candies, avoids chewing on things like ice, and does not grind their teeth. We routinely check the status of existing sealants at wellcare appointments, and Dr. Erica will recommend replacement if they become worn or are no longer present over time.
Beth Corona, RDH
Dental Hygienist at Sweet Tooth
Sweet Tooth Pediatric Dentistry
583 Saybrook Road
Middletown, CT 06457
(860) 347-4681
www.sweettoothkids.com